This section outlines settings and customization options for generating Transmittal documents.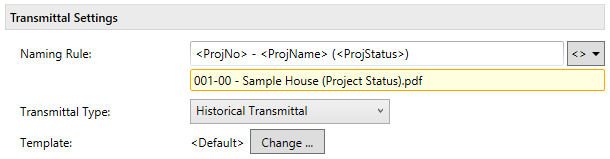
...
Naming Rule
All Naming Rule fields in Xrev Transmit can do two things, define the name of the file, but also set the folder location for these particular documents. Using the <> button you can add Project Information parameters from the Revit file as well as Microsoft Windows information displayed in the drop down list. For example:
| No Formatcode |
|---|
<ProjNo>-DocTrans-<Date> |
This would create a file called 201112021-12-DocTrans-131001.pdf located in the default output location. If I put all my document transmittals in a particular location I could do this:
| No Formatcode |
|---|
L:\Issue History\<ProjNo>\<ProjNo>-DocTrans-<Date> |
or if I want my transmittal in a particular sub-folder of the default output location
| No Formatcode |
|---|
Transmittal\<ProjNo>-DocTrans-<Date> |
...
There are currently 3 different Transmittal Types you can create in Xrev Transmit:
Historical Transmittal - This transmittal uses a built-in report designer template and displays the history of all issues for a particular project. Sometimes referred to as a Matrix Transmittal
Single Transmittal - This transmittal uses a built-in report designer template and only displays information for the current issue for a particular project. Sometimes referred to as a Per Issue Transmittal
MS Word Transmittal - This transmittal uses a Microsoft Word template and only displays information for the current issue for a particular project. Sometimes referred to as a Per Issue Transmittal
Use this drop down to specify which Transmittal Type you would like to use. This drop down affects what displays in the Template section.
...
This section dynamically changes depending on which Transmittal Type is selected.
Historical and Single Transmittals
...
Click the  button to select a customized Transmittal Template, create a new template, or further customize an existing template.
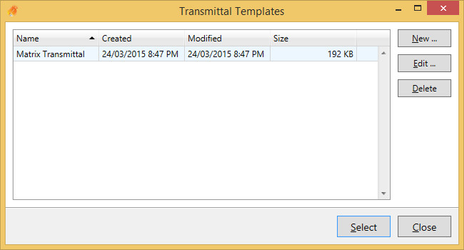
...
See Creating a New Transmittal Template with the Report Designer for more information on customizing report based templates.
...
The Template is an MS Word (2007) document (.docx). A sample template is installed in the following location:
| No Formatcode |
|---|
C:\ProgramData\Xrev Transmit\Transmittal Template.docx |
...
Once created, simply use the  button to browse to the new template file and select it.
Model Numbering Rule
This setting allows you to control how the Revit Model is numbered when you choose to include it on your Transmittal. If nothing is entered it will use the default being the Revit File Name.
Using the ![]() button you can select from System, Xrev or Project Parameters to create your Numbering Rule. Combine with Text to achieve the desired value.
button you can select from System, Xrev or Project Parameters to create your Numbering Rule. Combine with Text to achieve the desired value.
...
For the above example the numbering rule defined is:
| Code Block |
|---|
<Project.Parameters.ProjectCode_ANZRS!>-<Project.Parameters.Originator_ANZRS!>-00-ZZ-<Project.Parameters.DocumentType_ANZRS!>-<Project.Parameters.Role_ANZRS!>-00001 |
Model Naming Rule
This setting allows you to control how the Revit Model is named when you choose to include it on your Transmittal. If nothing is entered it will use the default being the Revit Model Name parameter.
Using the ![]() button you can select from System, Xrev or Project Parameters to create your Naming Rule. Combine with Text to achieve the desired value.
button you can select from System, Xrev or Project Parameters to create your Naming Rule. Combine with Text to achieve the desired value.
...
Sheet Numbering Rule
This setting allows you to control how the Sheets are numbered on your Transmittal. If nothing is entered it will use the default being the Sheet Number.
Using the ![]() button you can select from System, Xrev, Sheet or Project Parameters to create your Numbering Rule. Combine with Text to achieve the desired value.
button you can select from System, Xrev, Sheet or Project Parameters to create your Numbering Rule. Combine with Text to achieve the desired value.
...
For the above example the numbering rule defined is:
| Code Block |
|---|
<Project.Parameters.ProjectCode_ANZRS!>-<Project.Parameters.Originator_ANZRS!>-<Sheet.Parameters.VolumeSystem_ANZRS!>-<Sheet.Parameters.LevelLocation_ANZRS!>-<Sheet.Parameters.DocumentType_ANZRS!>-<Project.Parameters.Role_ANZRS!>-<Sheet.Number!> |
Sheet Naming Rule
This setting allows you to control how the Sheets are named on your Transmittal. If nothing is entered it will use the default being the Sheet Name. However, some companies use a Sheet Name and Sheet Name Line 2 approach on their Titleblocks.
Using the ![]() button you can select from System, Xrev, Sheet or Project Parameters to create your Naming Rule. Combine with Text to achieve the desired value.
button you can select from System, Xrev, Sheet or Project Parameters to create your Naming Rule. Combine with Text to achieve the desired value.
...
Transmittal Parameters
If you require more than the standard built in Revit parameters on your Transmittal, perhaps for compliance with ISO19650, you may need to add custom parameters to your Transmittal Template for use in the Report Designer. To do this, first you must add them here.
Select the

button
This opens a dialog to allow you to pick from parameters from your Revit Project (that you have open in the background). First select the Category of elements you want to add the parameter from, either Sheet Parameters or Project Information Parameters, then choose from the dropdown list, the parameter you wish to add. The Parameter Type will automatically be selected, however you can technically override it. So you could select a Number parameter but on the Transmittal Template we could treat it as Text.
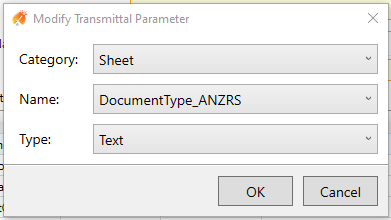
Select OK to successfully add this parameter. If you now went into the Transmittal Report Designer Editor this parameter would be available for placement.