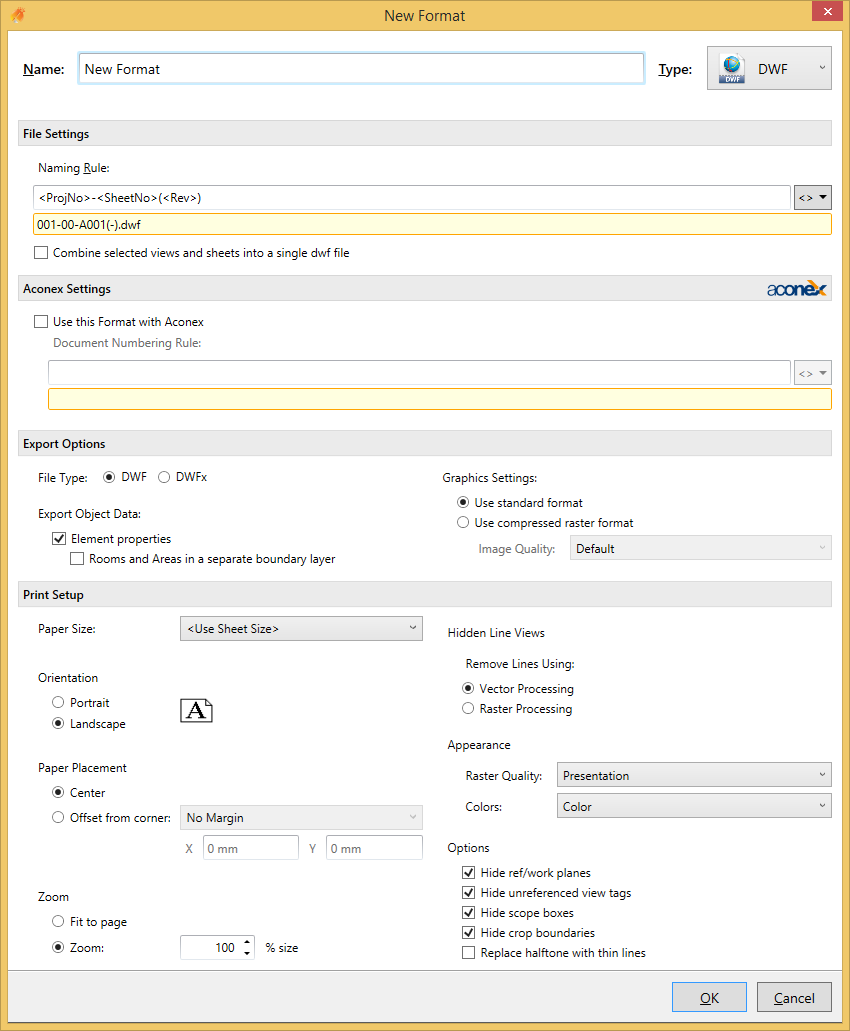
File Settings
Naming Rule
The Naming Rule setting defines a rule that will be used to name the exported file. See the Naming Rules section for more information.
Combine selected views and sheets
The Combine selected views and sheets into a single file option determines whether to combine all selected sheets into a single DWF / DWFx file.
Note: If you select this option then you cannot use Revit sheet parameters in the Naming Rule.
Aconex Settings
See the Format dialog section for more information.
Export Options
File Type
Define whether you’d like a DWF or DWFx
Export Object Data
Element Properties - Specify whether properties from Revit Family Types and Instances are exported. NOTE: Unpopulated fields are not exported, nor are custom Type parameters. Only custom Instance parameters are exported from Revit as at Revit 2012. Also, object data is only exported from views with the visual style set to Wireframe or Hidden Line.
Rooms and Areas in a separate boundary layer - select this option if you want room and area properties separately from the geometric representation, so that individual rooms and room data can be viewed with facility management software (such as Autodesk® FMDesktop), or DWF markup software (such as Autodesk® Design Review)
Graphics Settings
Use standard format - Select this option if you want to export images as PNG files.
Use compressed raster format - Select this option if you want to export images as compressed PNG files and specify the quality required.
Print Setup
Paper Size
Specify what sheet size you are using or select the <Use Sheet Size> option to have the export automatically handle varying size sheets by reading the title block size.
Orientation
Specify whether the sheet orientation is to be Portrait or Landscape.
Paper Placement
Specify how the revit sheet is positioned on the sheet. Either offset from the corner a nominated amount or placed centrally.
Zoom
Specify the scaling factor required.
Hidden Line Views
Select whether Hidden Line views are to be processed as images (Raster) or as lines (vector). Vector is generally quicker and of higher quality, but occasionally some information may not be printed, in which case raster settings may be required on that particular sheet.
Appearance
Specify the quality required of images/renderings captured on the sheets and whether the sheets are to be processed in Black and White, Greyscale or Colour.
Options
Hide ref/work planes
Automatically turn off reference planes so they don’t print/export
Hide unreferenced view tags
Automatically turn off any sections/elevations/callouts that have not been placed on sheets yet.
Replace halftone with thin lines
Automatically use thin lines for halftoned elements instead of a grey scaled line.
Hide scope boxes
Automatically turn off any visible scope boxes so they don’t print/export
Hide crop boundaries
Automatically turn off any visible crop boundaries so they don’t print/export
