Output Locations
- Matt Siebert

Overview
This section outlines how to use the various Output locations options in the Xrev Transmit settings.
Browse to a Folder
The most obvious way to set your output location is to use the folder button and browse to the specific folder where you want the files to be saved. However, there are much better ways to set output locations in Xrev Transmit than using the browse button. The issue with this option is for each new project you more than likely need to reset the output location each time.
Using Revit Parameters
We suggest browsing to a folder initially, then modifying project specific folder structures by swapping out Revit parameter variables which can be placed using the  button. This essentially means that these parts will parametrically update based upon the settings in the Revit file, eliminating the need to edit the Output Locations each time. Basically you can set once and forget about them provided you have a standard folder structure.
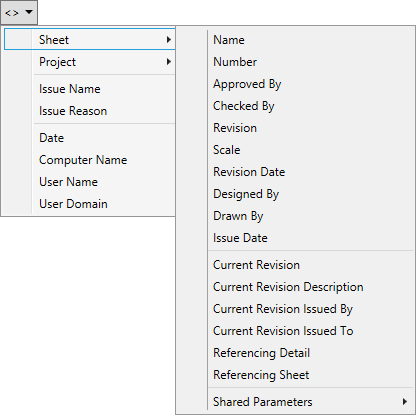
Valid variables currently are either from the Project Information category or Sheet category:
Default Output Location, Project Output Location, Transmittal Naming Rule:
| Variable | Meaning |
|---|---|
| <ProjName> | Revit Project Name |
| <ProjNo> | Revit Project Number |
| <ProjStatus> | Revit Project Status |
| <ProjIssueDate> | Revit Project Issue Date |
| <IssueName> | Xrev Transmit Issue Name |
| <IssueReason> | Xrev Transmit Issue Reason |
| <Date> | Current Date from the System |
| <ComputerName> | Computer Name from the System |
| <UserName> | User Name from the System |
| <UserDomain> | User Domain from the System |
There are additional Parameters available for the individual Format Naming Rules as these gather sheet parameters as well:
| Variable | Meaning |
|---|---|
| <SheetName> | Revit Sheet Name |
| <SheetNo> | Revit Sheet Number |
| <ApprovedBy> | Revit Sheet Approved By |
| <CheckedBy> | Revit Sheet Checked By |
| <Rev> | Revit Sheet Current Revision |
| <RevDate> | Revit Sheet Current Revision Date |
| <DesignedBy> | Revit Sheet Designed By |
| <DrawnBy> | Revit Sheet Drawn By |
| <SheetIssueDate> | Revit Sheet Issue Date |
Tip: Custom Project Information and Sheet category parameters are also available using the variable button, the context menu or directly typing the variable into the text box.
All of these variables can be used to define both file names as well as folder names or parts of folder names. For example say you have a folder structure as follows:
P:\0001254\Outgoing\Architectural
This could be rewritten as (where 1254 is the Project Number in Revit):
P:\000<ProjNo>\Outgoing\Architectural
Absolute Paths
An absolute path is a folder path that is complete on its own. For instance, a mapped drive location or a UNC folder path. You can actually place an absolute path in any of the following sections. This doesn’t mean you should, it’s just that technically it’s supported:
- Global Default Output Location
- Transmittal Naming Convention
- Project Output Location (Override)
- All Format Naming Conventions (DWG, PDF, DWF, DXF, DGN)
So what does that mean? Basically by placing a full file path for one of the naming rules it overrides the Global Default Output Location and/or the Project Output Location.
Relative Paths
A relative path is one that is not rooted. That is, it does not start with a drive specification (i.e. "C:\") or a UNC specification (i.e. "\\SERVER\Folder"). Relative paths can be combined to append or modify a base path without completely overriding it. The global Default Output Location must be an absolute path.
For example, suppose the global Default Output Location is set to the following absolute path:
C:\My Projects\<ProjNo>
and the Transmittal Naming Rule is set to the following relative path:
Issued\Transmittals\<ProjNo>-DocTrans-<Date>
then the result of combining these paths will be:
C:\My Projects\<ProjNo>\Issued\Transmittals\<ProjNo>-DocTrans-<Date>
This provides complete flexibility to achieve any desired output location in a parametric way.
Outputting Specific Formats to Individual Folders
By inputting folder names into the naming convention fields for each format type it is possible to output these formats to their own individual folders.
For example, suppose the global Default Output Location is set to the following absolute path:
C:\My Projects\<ProjNo>\Issued\<Date>-<ProjStatus>
and we have a PDF Format with it's Naming Rule is set to the following relative path:
PDF\<ProjNo>-<SheetNo>(<Rev>).pdf
then the result of combining these paths will be:
C:\My Projects\<ProjNo>\Issued\<Date>-<ProjStatus>\PDF\<ProjNo>-<SheetNo>(<Rev>).pdf
With the fields substituted with the Revit Project Parameter values:
C:\My Projects\2011_106\Issued\140616-TENDER\PDF\2011_106-A205(3).pdf
Similarly, if you want a PDF set to go in a completely different location, for instance a copy to an FTP site you can use absolute paths. For example, suppose we replaced the relative path in our PDF Format with the following absolute path:
F:\<ProjNo>\<Date>\<ProjNo>-<SheetNo>(<Rev>).pdf
In this case, the PDF location overrides the global default output location and as such it is ignored.
Environment Variables
Xrev Transmit also supports using environment variables in your naming rules and output locations.
For example:
- %ALLUSERSPROFILE%
- %LOCALAPPDATA%
- %APPDATA%
- %PROGRAMFILES%
- %PROGRAMDATA%
- %SYSTEMDRIVE%
- %USERNAME%
- %USERPROFILE%