Revit Revision Tool
- Matt Siebert
- Chris Price
Overview
Xrev Transmit is meant to be used with the standard Revit revision tool. Rather than enforce complicated workarounds that could potentially be rendered useless when/if Autodesk add a fix for any limitations, we have designed the tool to compliment Revit within those constraints.
As such, Xrev Transmit will not automatically auto-increment revisions. Simply because we believed this approach does not represent a good workflow. Typically when adding new revisions to sheets you should either be clouding the specific changes and tagging them, or checking a specific milestone issue to show on the sheet through the sheet instance properties.
Revit Limitations
Prior to Revit 2022, revision sequencing was limited to alphabetic or numeric. Therefore alphanumeric numbering sequences such as P1, P2, P3 or C1, C2, C3 were not achievable without workarounds.
Known workarounds include:
- Using the Issued By field and mapping your revision sequence to this. Using this method you won't be able to get auto-incrementing of revisions or do sheet specific number sequencing.
- Add a prefix to the Revision label in the titleblock and then use the standard number sequence from Revit. With this method the revision schedule is unable to show the prefix.
- Use a custom "text" shared parameter added to the sheet category. Using this method you won't get automated incrementing or be able to use the automated Revit Revision Schedules.
Another limitation is the lack of ability to have a revision schedule be broken into multiple parts like all other Revit Schedules. As such you are limited to one revision schedule with a single group of rows.
Adding Revisions
As mentioned previously Xrev Transmit does not automatically add Revisions to your sheets. Once your sheets are setup and ready to issue you then run the Xrev Transmit Print/Export command.
Before you can add a Revision you must create a Revision to add:
Creating a new revision
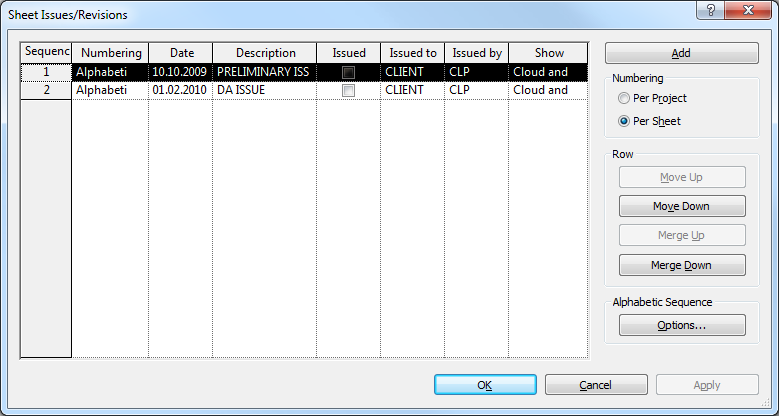
- In the View tab, under Sheet Composition, Select Revisions.
- Set your numbering method to be either Per Sheet or Per Project
- Per Sheet - Each Revision Counting is individually counted per sheet, so the first revision on that sheet will always be 1 or A.
- Per Project - The Revision count is global, so it is possible for the first revision of a sheet to be 3 or D.
- You can edit the Alphabetic sequence to add/remove letters from the sequence that may be confusing. For instance I or O.
- Select Add to add a new row to the list.
- Set the numbering method to be used and fill out the various methods.
- You have now created a new revision that can be applied to sheets/clouds. Note the Sequence number of this revision and it is always good practice to set the previous revision to be "Issued" using the check box so no more clouds can accidentally be added to that sequence.
There are two ways to add a revision to a sheet:
Editing the Revisions on Sheet List
- To show a particular Revision on a sheet first select that sheet or open it to show its instance properties.
- In the Identity Data section there is a parameter called "Revisions on Sheet", select the Edit... button next to this to open up the Revisions on Sheet window.
- Add a check to which Revisions you need to show on this sheet.
Note: Some rows may be checked and greyed out, this indicates that a revision cloud has been placed on this sheet associated to that particular revision. Therefore, if you want to remove that particular revision from the Revision Schedule you would need to remove the Revision cloud associated with it on this sheet.
Adding a Revision Cloud
- After you have created a Revision to add, go to the view or sheet that you would like to cloud.
- Go to the Annotate tab, Detail panel and select Revision Cloud.
- In the Instance Properties of the sketch mode ensure the Revision is set to the correct sequence number you added earlier.
- Sketch your revision cloud.
- Choose the Green Tick to finish sketch.
- Use Tag by Category to tag your Cloud if necessary.
Setting up your Title Block to use the automated Revit Revisioning System
To use the Revit Revisioning tool as opposed to using a manual system you generally want to include two parts. A label that shows the current Revision, and a schedule to display or historical issues of this sheet.
- Open/Edit your titleblock family or begin a new family.
- If you don't already have a Revision Schedule in your Project Browser, add one by going to the View tab, Create panel and choose Revision Schedule.
- Add the required fields you need to display, but ensure you include the "Revision Sequence" and sort by this, as this will ensure you schedule correctly sorts when using both alphabetic and numeric numbering sequences.
- Format the Schedule using standard scheduling tools to have it appear how you like.
- Hide the Revision Sequence column by right clicking on it and choosing Hide.
- Place the Revision Schedule on the sheet by dragging it from the Project Browser into the view.
- Go to the Home tab, Text panel and choose label and place it somewhere.
- Add the "Current Revision" parameter to the Label Parameter List
- Choose OK
- You have now setup your titleblock to correctly use the Revit Revisioning System.